from mlforkids importMLforKidsImageProject
# treat this key like a password and keep it secret!
key = "bbdf2510-ab32-11eb-b9b5-a98e843d496781e6b159-7cb9-471e-8b4d-b257831c4688"
# this will train your model and might take a little while
myproject = MLforKidsImageProject(key)
myproject.train_model()
# CHANGE THIS to the image file you want to recognize
demo = myproject.prediction("my-test-image.jpg")
label = demo["class_name"]
confidence = demo["confidence"]
# CHANGE THIS to do something different with the result
print ("result: '%s' with %d%% confidence" % (label, confidence))
I was thinking a lot what title I should give to this post as I am going to cover a bunch of things here. I intentionally did not mention any technology or service provider in the title as you can tailor it for your own needs: you may not have a Synology but a QNAP NAS or you may rather prefer Google G Suite over Zoho Mail.
I would like to show you how I set up my NAS to reach that via HTTPS, how I run my website there, how I managed to create a [email protected] email address, which looks really professional in a CV. I am also sharing with you some best practices and explanations why I decided to use the following technology stack:
Synology DSM 6.2
Any DNS provider
Cloudflare
Let’s Encrypt
Zoho mail
Buy your custom domain
First you will need a custom domain name. I decided to use szurovecz.hubecause Szurovecz is my surename and I wanted a cool email address built from my name: janos[at]szurovecz[dot]hu. I also wanted to publish my website on janos.szurovecz.hu. Needless to say this also allows me to let my family members have their own email address and website. If [surename].com (built from your family name)is already registered then try to choose another TLD: [surename].dev or [surename].eu may still be available. Of course you can pick any available domain name you want.
I recommend you GoDaddy, Namecheap, Porkbun or Rackhost but there are thousands of DNS providers on the market. It is worth to check the price, you might be surprised about the differences.
Hey, my ISP does not give me a static IP address. What should I do?
You can pay extra money for a static IP address. It would definitely simplify your life as you will only need to edit a DNS record and you can leave that as is forever. If you do not want to pay for it or your ISP cannot provide you a static IP address then you can workaround this with Cloudflare.
What we need from Cloudflare is the ability to modify a DNS record via an API. The idea is that a background process will be checking your IP address and whenever that changes, it updates the DNS record. It is important to understand that your website may be temporarily not available for a short time until the IP address change is propagated. It should not take more than a few second or minutes, but it also means you should not use this approach for critical websites that must be available all the time.
I was using Dynu.com before I migrated to Cloudflare. Dynu.com also has an API but its free tier limits the number of DNS record you can manage. There is no such limitation in Cloudflare.
Set up Cloudflare
Create an account on cloudflare.com and add a new site. Type your domain name and select the free plan. After a quick scan all the existing records will be listed. Going forward you will be requested to change your name servers. It means you have to login to the administration interface of your domain registrar and replace the existing name servers to the cloudflare ones. Once you are done let’s wait for a while. If everything is fine then all DNS requests for your domain will first go to your registrar but the actual IP address resolution will be done by Cloudflare.
All of my DNS records
My advice is to create an A record for your NAS like nas.szurovecz.hu. Only this record will need to be updated from your NAS whenever your IP address changes. Please note that the proxy is disabled for this A record above: I do want direct access to my NAS. On the other hand the janos CNAME record is proxied, which means all requests coming to the janos.szurovecz.hu are handled by my NAS too, but users communicate only with Cloudflare not directly with my NAS. The Cloudflare proxy gives you such nice features like HTTPS, HTML compression, DDoS attack handling and last but not least it does not expose your NAS.
Update the DNS record
Docker is a great tool to run almost anything in a controlled way, in isolation on your server/workstation. In general I encourage you to check if there is a Docker-based solution when you need something. Updating the IP address in your DNS record can also be done with Docker. Moreover, Synology DSM has a nice built-in Docker integration.
Downloading a Docker image that will be updating our DNS record
Download the oznu/cloudflare-ddnsimage from the repository. Once done launch the image and click on the Advanced Settings button. You have to provide some environment variables for the image:
PROXIED: Although it is false by default, it is better to explicitly set. If you are updating a proxied record with this approach and you forget this variable then the proxy will be turned off after the first run and your origin IP will be revealed.
Important environment variables to reach the Cloudflare API
After this you can finish the wizard and your new container should be running. The log tab on the container details screen shows whether the domain update was successful.
The NAS domain now should be resolved to the current IP address.
Create a certificate for your NAS
Cloudflare gives you HTTPS support off the shelf but only if the record is proxied. As I wanted to reach my NAS directly, I had to take care off a valid certificate.
Let’s Encrypt gives you valid, trusted certificate for free. However the certificate need to be renewed every 90 days. There are plenty of ways doing this, fortunately DSM has built-in support.
In order to be able to create or renew your certificate, port 80 must be available on your NAS. If your NAS is behind a router then create a port forward in your router or define your NAS as a DMZ. You can find more information about these in your router’s manual. Actually this is one reason why this record cannot be proxied in Cloudflare.
Creating a Let’s Encrypt certificate
Create a new Let’s Encrypt certificate. Use your NAS domain name and any of your email addresses.
If the certificate is created then you can define which certificate you would like to use for which services.
Configuring the certificates
Publish your website
I really cannot explain in this post how a website can be created. You can host a static website or you can even run a dynamic one. But you have to decide the address of your site: it can be either a subdomain or the root domain. Create a CNAME record in Cloudflare and set your NAS’ domain as target. As you can see above, this record is proxied so I can utilize all those features that are provided by Cloudflare.
For a static website I recommend to use the DSM Web Station: create a new virtual host, set you document root that contains the index.html and you are done. For a more complex site you can use the power of Docker. In this case I suppose you have a running web-server in your container that need to be exposed so make that accessible from the internet.
Expose your Docker web-container
If you have a running Docker container in which there is a running web-server then you need to create a reverse proxy in DSM. You do not need to support HTTPS in your container as
Your new reverse proxy could also support HTTPS
Cloudflare also acts as a reverse proxy, so HTTPS support is only need to be enabled there
Creating a reverse proxy to expose our web-server running in a container
This setup allows HTTP requests coming from the internet to the janos.szurovecz.hu host and port 80 to reach the container on port 5180. As this subdomain is proxied in Cloudflare, only Cloudflare will reach this endpoint directly.
This way you can easily publish separated websites for your family members.
And finally the email
Hosting a mail server requires high availability, otherwise the incoming emails will be lost when your server is down. Therefore I chose a paid service instead of managing it on my own server. Of course I wanted to keep the cost low so I decided to use Zoho.
I used to use Google G Suite too. That is a really nice service though more expensive than Zoho. The yearly price for 1 user is only €12 in Zoho. For the same price I would go with Google but I am okay with Zoho.
Register an account in Zoho choosing Business Email.Personal email would result a [email protected]address. In the Control Panel you can manage your domain, but it will be asked during the sign-up process. You will need to create records in Cloudflare to prove you ownership and to reduce the risk of being recognized as a spammer. Check my Cloudflare screenshot above.
Good to know that you can create any alias, so you can use [email protected]too for free. You can even register multiple domains and use as alias, you will need to pay only on user basis.
This is like Lego bricks: you have to decide what you would like to achieve and check what you already have in your box. If you do not need a certificate then you can completely ignore that part. If you are using any Linux OS on your NAS then I am sure you will find how you can install Docker or how you can create a reverse proxy in Nginx running on your host. Even if you chose another email service provider quite similar steps will need to be taken.
Quite a few people need exactly the same things and having exactly the same infrastructure but if you understand the steps above, you are ready to customize it. So what is your plan now?
Capacitance calculations in the COMSOL Multiphysics® software seem easy. If you only have two conductors, the recipe is simple: Take one conductor and set it to grounded, set the other as a terminal, and compute the solution. Then, a built-in variable delivers the capacitance. But what if you have more than two conductors, like in touchscreens, transmission lines, and capacitive sensors? If standard textbook terminology has you lost, follow along with this working example of calculating a capacitance matrix.
What Is Self-Capacitance?
Capacitance is the ability of a system to store electric charge. It can be defined by the amount of charge that a body needs in order to raise its electric potential by 1 volt against a grounded reference potential. In a linear system, this is
where Q is charge, V is potential difference relative to ground, and C is the capacitance.
Before we get to multiconductor systems, remember that by definition, even a single isolated conductor has a capacitance, defined relative to a grounded spherical shell at infinity. For the case of a conducting sphere, this self-capacitance is
We can use this formula to calculate, for example, the self-capacitance of planet Earth — it is roughly 710 microfarad.
Human bodies can also be charged up, as seen here.
Hence, the human body, too, exhibits self-capacitance (also called body capacitance). Depending on posture and the surrounding area, body capacitance is in the range of 100 picofarad and can even create a tingling sensation in humans. You can, for example, easily charge up your body capacitance to several thousand volts while brushing your hair in the morning. Make sure to be well grounded before starting the day!
Comparing Mutual and Maxwell Capacitance Matrices
In typical electrical systems, capacitances between several conductors are of most interest. Mutual capacitance, also referred to as parasitic or stray capacitance, is desired or undesired capacitance (a buildup of charge) that occurs between two charge-holding objects. If you bring a charged object near another object, the charge distribution on the first object will change due to the process of electrostatic induction (not to be confused with electromagnetic induction). Particularly in transmission systems, capacitive coupling between lines is often unintended and troublesome, as it can create noise.
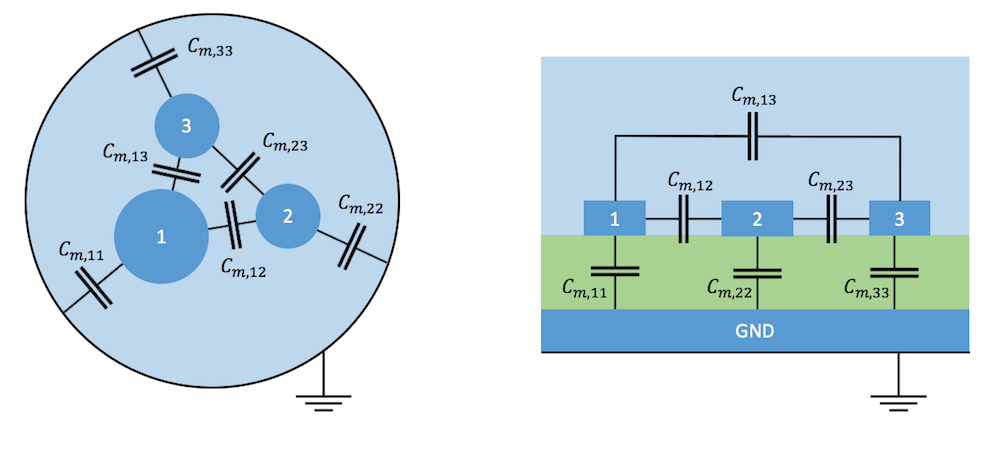
Typical examples of mutual capacitance in a shielded three-conductor cable (left) and between microstrip transmission lines over a ground plate (right). The transition from a continuous field model to a lumped model with discrete capacitors means to shrink the conductors to points while moving the charges at their surface to the plates of capacitors shown between them.
For convenience, it is possible to arrange mutual capacitances of a system of N conductors and one additional ground in matrix form:
The coefficients of this matrix, also called partial capacitances or lumped capacitances, are used in a circuit simulator when you reduce a physical system to a network of discrete elements.
In field theory, another matrix form is more common: the Maxwell capacitance matrix. Because the name is so similar and the coefficients are not identical, it is important to understand the relation between mutual and Maxwell capacitance matrices. The Maxwell capacitance matrix describes a relation between the charge of the ith conductor to the voltages of all conductors in the system.
The Maxwell capacitance matrix coefficient could be determined by measuring the charge on conductor 1, when only the potential and all other electrodes are grounded. Therefore, the matrix is also often called the ground capacitance matrix. Its inverse, , is referred to as the elastance matrix.
We can also calculate the total charge on conductor 1 by summing up the contributions from the self- and mutual capacitances as follows.
For a system with N conductors, the relation between the mutual and Maxwell capacitance matrices is then
You can easily tell a Maxwell capacitance matrix by its negative nondiagonal elements.
Working Example: Mutual Capacitance of Two Spheres
Now that we have a clear definition of the terminology, let’s explore how easy it is to calculate capacitance matrices for arbitrary systems of conductors in COMSOL Multiphysics. To feel solid ground under our feet, we’ll start with a system with a known analytical solution. (Did I mention that I love analytical solutions? Actually, whenever I start a new simulation project, I try to find a simple system with an analytic solution to reproduce.)
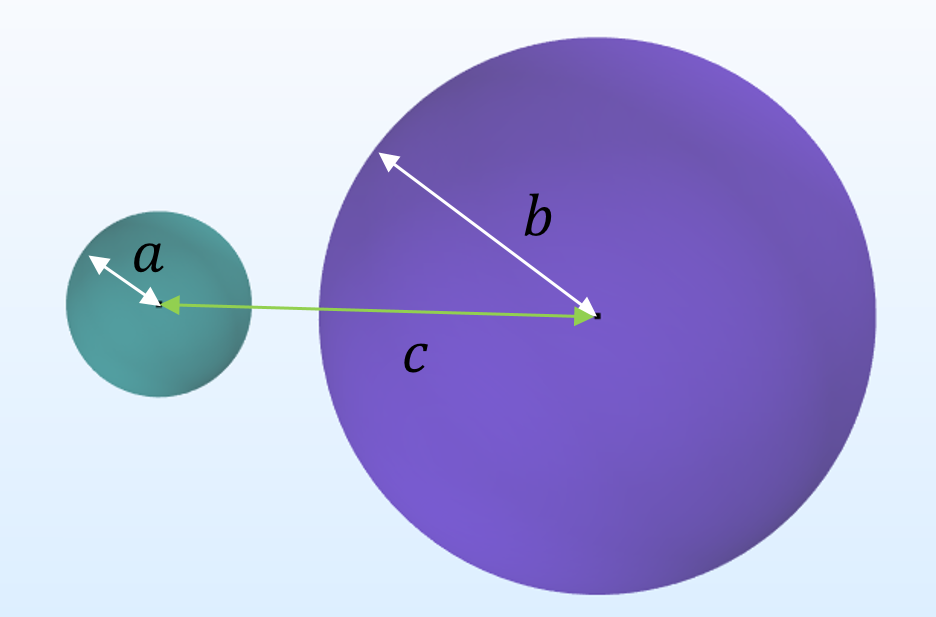
In our case, we can use a system consisting of two conducting spheres of radii a and b, separated by a distance c and a ground reference at infinity.
Closed-form expressions for such a system have been known since Maxwell’s times. I am referring to two readily available publications of de Queiroz (2003) and Lekner (2011). The expressions for the three Maxwell capacitance matrices are
where
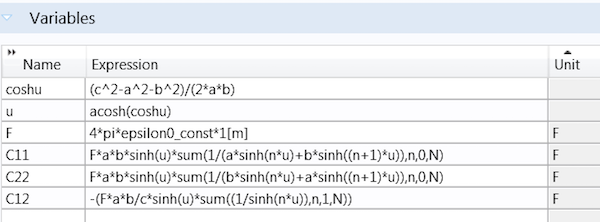
You can easily declare these expressions as variables in COMSOL Multiphysics by using the sum operator:
With a parametric sweep over N, we find that the series converges rapidly when the spheres are not too close to each other. We can safely set N to 10 for a given set of parameters: a = 0.1, b = 0.3, and c = 0.5.
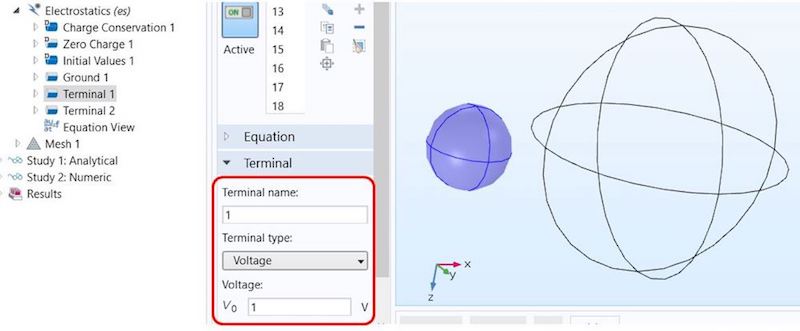
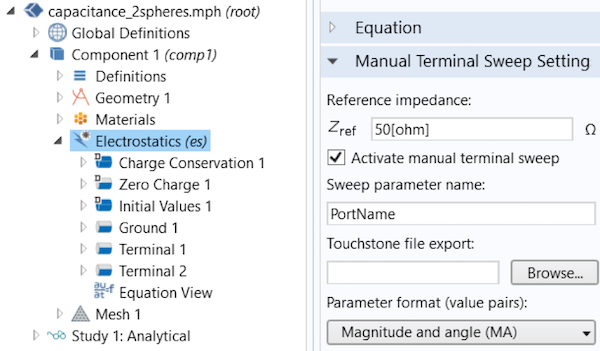
In order to calculate the capacitance matrix in the Electrostatics interface, we set a terminal condition to one sphere with a potential of 1 V.
Next, we duplicate the feature, apply it to the second sphere, and set the terminal name to 2. In order to calculate capacitance matrices, we need to apply different voltage or charge patterns to the terminals. For didactic reasons, we’ll discuss the traditional manual terminal sweep before introducing new, significantly faster technology that was released in version 5.3 of the COMSOL® software. While the new technology is faster in a large class of very common problems, the manual method is more general.
A manual terminal sweep is activated directly in the Electrostatics interface.
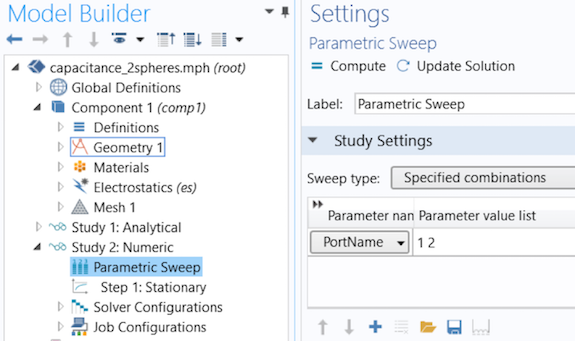
After declaring the Sweep parameter name in the Global Parameters section (PortName by default), you can then run a parametric sweep over PortName.
In the model, the COMSOL Multiphysics software sets one terminal to 1 V and all others to ground during the sweep, resulting in the following two solutions:
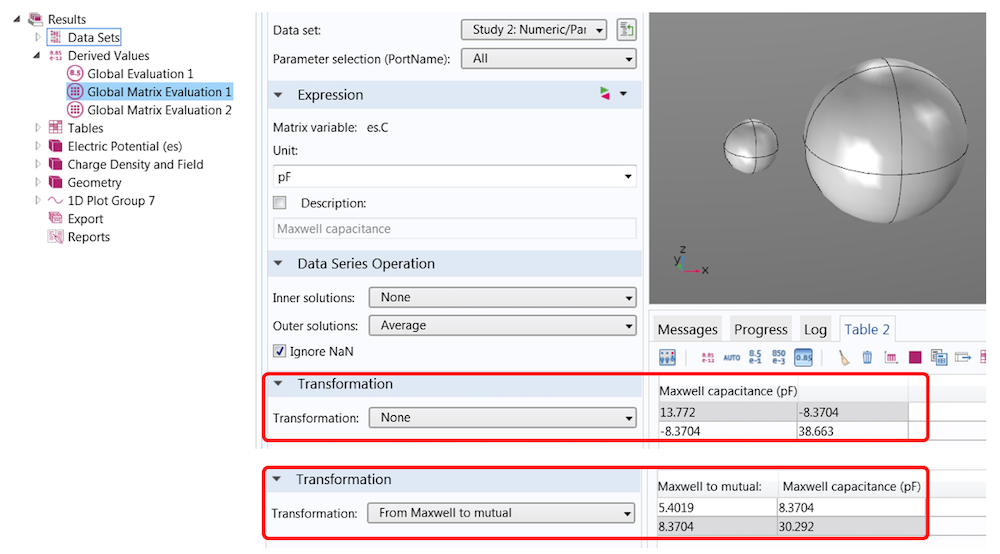
You can use Results > Global Matrix Evaluation to extract the capacitance matrices in different notations, including the Maxwell capacitance matrix and the mutual capacitance matrix.
In this simple example, their relation is
If you are setting charge terminals instead of voltage terminals, the primary solution is the inverse capacitance matrix. A set of transformations are available that can help you convert the charge into the above-mentioned matrices.
Gain Speed with Stationary Source Sweeps and the Boundary Element Method
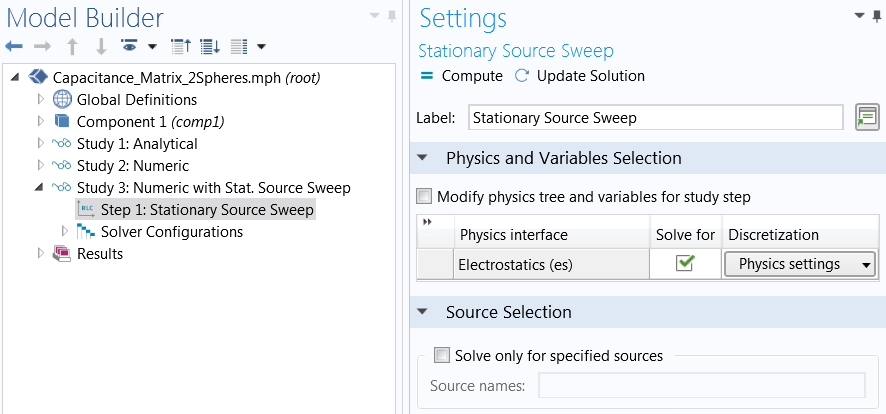
In COMSOL Multiphysics version 5.3, we have introduced many powerful new modeling methods. One feature particularly relevant to capacitance matrix calculations is the new Stationary Source Sweep study step.
In contrast to manual terminal sweeps, which use a parametric sweep for PortName, this new technology accounts for the fact that applying different charges or voltage patterns to the electrostatic system doesn’t change the system matrix of the underlying FEM equations, only their loads. This means that the matrix needs to be inverted only once and can be reused for all other load cases. This approach can dramatically reduce computational time, especially when the number of terminals is large or other parametric sweeps (e.g., for the geometry) are needed.
Even for a moderate number of terminals, like in the Touchscreen Simulator simulation app, the speed gain is surprising: I could reach a factor of 7.8 on my machine for this model with the same number of DOF!
A stationary source sweep is also easier to set up. There is no need to activate a manual terminal sweep and define a PortName variable and a parametric sweep. All you need to do is select a study step. By default, the study will run through all terminals. Alternatively, you can define specified sources that you want to cover.
If the stationary source sweep is so powerful, then why do we keep the traditional approach at all?
There are cases where we appreciate a recalculation of the system matrix; for instance, in nonlinear or multiphysics problems or if meshes should be adapted for each terminal configuration. In such cases, a manual terminal sweep is a better method.
Another powerful feature that comes with version 5.3 of the COMSOL® software is the boundary element method (BEM) in electrostatics. Compared to FEM, where a mesh in all domains (including the surrounding air domain) is needed, BEM avoids meshing in the infinite void, which reduces the number of DOFs. You can learn more about combining BEM in electrostatics and capacitance matrix calculation in the Modeling a Capacitive Position Sensor Using BEM tutorial.
Can’t wait to learn more about the new BEM implementation? Read about how this method has already helped to simplify corrosion modeling in a previous blog post.
Concluding Thoughts on Capacitance Matrix Calculation
In this blog post, we have looked into the calculation of capacitance matrices, discussed the different terminologies, and provided a numerical solution for a well-known problem that has a closed-form solution. While the simple model presented here can provide a reference for your own models, the new features released in version 5.3 can help you to create large models with many terminals and additional parametric sweeps more efficiently.CONTACT COMSOL FOR A SOFTWARE EVALUATION
This tutorial is all about dev work. Specifically, running multiple wordpress instances as a way to keep projects separated as well as testing in a non-live environment. Synology makes this easy. Let me show you how.
First of all, allow me to preface this by saying there are a few ways you could go about trying to achieve this. The route I chose allows access outside the localhost/local area network via the Synology dynamic DNS service. I’m not interested in serving sites via my local machine to the outside network beyond personal access for public use, so i’m not going to be covering redirects or proxies, or any other advanced routing today. I would not recommend serving sites to the wider public via your personal machines. This is simply an easy way of accessing development sites when outside of the network, for personal use only.
Step 1: Getting Prepared
We need to download WordPress, and get our folders setup. First head over to https://wordpress.org/download/ and download it to your computer. I’m using version 5.3, but your version may be different. Once downloaded, login to your disk station and copy the entire zip archive to your web folder. Unzip it inside your web folder. If you do not have a web folder it’s because you have not yet setup webstation. Make sure you have webstation running, as well as php, mariaDB, and phpMyAdmin.
Step 2: Adjusting The Settings
Next you are going to want to create a new folder for the site you are working on. I’m calling mine “woocommerce”. Copy all the files from your unziped WordPress 5.3 archive and paste them into the new project folder you created.
Now that everything has been prepared, we can tweak our file settings and get the database running. If you try to run WordPress at this point, you’re going to get some serious errors. The first thing we need to do is get our “wp-config.php” file ready.
wp-config.php
/** * The base configuration for WordPress * * The wp-config.php creation script uses this file during the * installation. You don’t have to use the web site, you can * copy this file to “wp-config.php” and fill in the values. * * This file contains the following configurations: * * * MySQL settings * * Secret keys * * Database table prefix * * ABSPATH * * @link https://codex.wordpress.org/Editing_wp-config.php * * @package WordPress */
// ** MySQL settings – You can get this info from your web host ** // /** The name of the database for WordPress */ define( ‘DB_NAME’, ‘woocommerce’ );
/** MySQL database username */ define( ‘DB_USER’, ‘wordpress_user’ );
/** MySQL database password */ define( ‘DB_PASSWORD’, ‘password’ );
/** MySQL hostname */ define( ‘DB_HOST’, ‘localhost:/run/mysqld/mysqld10.sock’ );
/** Database Charset to use in creating database tables. */ define( ‘DB_CHARSET’, ‘utf8’ );
/** The Database Collate type. Don’t change this if in doubt. */ define( ‘DB_COLLATE’, ” );
/**#@+ * Authentication Unique Keys and Salts. * * Change these to different unique phrases! * You can generate these using the {@link https://api.wordpress.org/secret-key/1.1/salt/ WordPress.org secret-key service} * You can change these at any point in time to invalidate all existing cookies. This will force all users to have to log in again. * * @since 2.6.0 */ define(‘AUTH_KEY’, ‘XXX’); define(‘SECURE_AUTH_KEY’, ‘XXX’); define(‘LOGGED_IN_KEY’, ‘XXX’); define(‘NONCE_KEY’, ‘XXX’); define(‘AUTH_SALT’, ‘XXX’); define(‘SECURE_AUTH_SALT’, ‘XXX’); define(‘LOGGED_IN_SALT’, ‘XXX’); define(‘NONCE_SALT’, ‘XXX’); /**#@-*/
/** * WordPress Database Table prefix. * * You can have multiple installations in one database if you give each * a unique prefix. Only numbers, letters, and underscores please! */ $table_prefix = ‘XX_’;
/** * For developers: WordPress debugging mode. * * Change this to true to enable the display of notices during development. * It is strongly recommended that plugin and theme developers use WP_DEBUG * in their development environments. * * For information on other constants that can be used for debugging, * visit the Codex. * * @link https://codex.wordpress.org/Debugging_in_WordPress */ define( ‘WP_DEBUG’, false ); define( ‘FS_METHOD’, ‘direct’ ); /* That’s all, stop editing! Happy publishing. */
Create a database username and type it into the line labeled “define( ‘DB_USER’, ‘XXXXXXXXXX’ );”, replacing the X’s with your chosen name. Also choose a password for the password line directly below.
At the bottom of the above screenshot you see a block of code with a large blank space. This is where you need to paste your secret-key. You can generate a key for this file at the link below. Just follow the link, copy the code and then paste it into your config file.
https://api.wordpress.org/secret-key/1.1/salt
In addition to the above edits, we will also need to change the line labeled “$table_prefix = ‘XXXX’;” to something unique, keep it short. You will also want to change the line labeled “define(‘WP_SITEURL’, $pageURL.’/woocommerce’);” Replace woocommerce with whatever you named your site folder inside the web folder.
Now that we’ve got the config file setup, we can turn our attention to the .htaccess file.
.htaccess
# Synology PHP
AddHandler default-handler .htm .html .shtml
AddHandler php-fastcgi .php
AddType text/html .php
Action php-fastcgi /php56-fpm-handler.fcgi
# Synology PHP

# BEGIN WordPress
# The directives (lines) between `BEGIN WordPress` and `END WordPress` are
# dynamically generated, and should only be modified via WordPress filters.
# Any changes to the directives between these markers will be overwritten.

RewriteEngine On
RewriteBase /woocommerce/
RewriteRule ^index\.php$ - [L]
RewriteCond %{REQUEST_FILENAME} !-f
RewriteCond %{REQUEST_FILENAME} !-d
RewriteRule . /woocommerce/index.php [L]


# END WordPress
We just need to update two spots in red with the folder name of our project. Again, in my project that was “woocommerce”. Paste both of these modified text files in the folder with the rest of your WordPress files.
Step 3: Create Database
We need to create a database for the WordPress server to store data, including users, posts, and whatever else you create for your site. Setting up Maria DB 10 and phpMyAdmin is not the purpose of this tutorial, so i’m going assume you already know how to do that and have already set both up. Upon logging into phpMyAdmin, you need to create a new database by pressing the “New button on the left hand side of the screen. This will bring you to the Databases screen where you can enter a name for your new database, and then press the create button. Your new database is now created.
Next you are going to want to go to the User accounts screen which can be accessed from menu bar along the top of the screen. From this screen you may either create a new user for your database, or re-use another user you have already created.
That’s it, you should now be ready to use your new site if you did everything correctly. Now navigate to your synology’s webstation address (for me, this is https://myname.synology.me/woocommerce). There are many domain options available through the synology DDNS system, so yours may differ from mine. You can repeat these steps as many times as you’d like for as many instances of WordPress as you’d like, just create a new folder for each site you want to create.