Get memory specifications for the following iMac models, then find out how to install memory in them:
iMac (Retina 5K, 27-inch, Mid 2015)
iMac (Retina 5K, 27-inch, Late 2014)
iMac (27-inch, Late 2013)
iMac (27-inch, Late 2012)
Memory specifications
These iMac models feature Synchronous Dynamic Random-Access Memory (SDRAM) slots on the rear of the computer near the vents with these memory specifications:
Number of memory slots
4
Base memory
8 GB
Maximum memory
32 GB
Use small outline dual inline memory modules (SO-DIMM) that meet all of these criteria:
SPECIAL NOTE: The following instruction only works when you will install tensorflow directly in window, NOT through miniconda/anaconda; Tested and it doesn’t work if you install all following required software but run tensorflow through conda enviroment.
SOLUTION in mimiconda: Python 3.8: conda install tensorflow-gpu=2.3 tensorflow=2.3=mkl_py38h1fcfbd6_0 (running this solve problem on windows on 19/12/2021, tested and and worked, the reason we use Python 3.8 and Tensorflow 2.3 here is for CST2021 Python (support python 3.6-3.8) compability on Superlens server.)
I think Windows users, including me, have suffered enough. You are probably stumbling on this after trying hours or even days to make this work. So, as a kindness, I will just cut to the chase and show you the steps you need to install TensorFlow GPU on Windows 10 without giving the usual blog intro.
Step 1: Find out the TF version and its drivers.
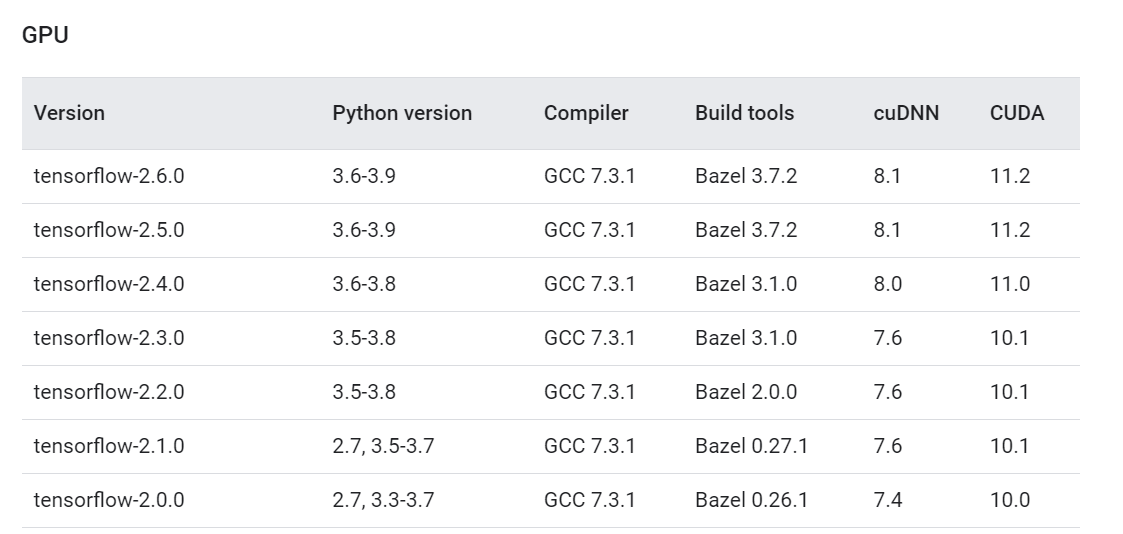
The first, very important step is to go to this link and decide which TF version you want to install. Based on this, the CUDA driver versions and other software versions change.
As of writing this guide, TF 2.6.0 is the latest, and we will be installing that one.
We are only interested in the TF version, cuDNN, and CUDA versions. We keep this tab open and move on to the next step.
Step 2: Install Microsoft Visual Studio
Next, we install Microsoft Visual Studio. Note that this one is different than Visual Studio Code, which is a lightweight IDE so many people love.
Run the downloaded executable and it will take a minute to download the requirements. Then, it will ask you to choose what workloads to install. We don’t want any, so just click install without workloads and click continue. After the installation is done, it will ask you to sign in but you don’t have to.
Step 3: Install the NVIDIA CUDA toolkit
NVIDIA CUDA toolkit contains the drivers for your NVIDIA GPU. Depending on your Windows, they may or may not be already installed. If installed, we should check their version and see if they are compatible with the TensorFlow version we want to install.
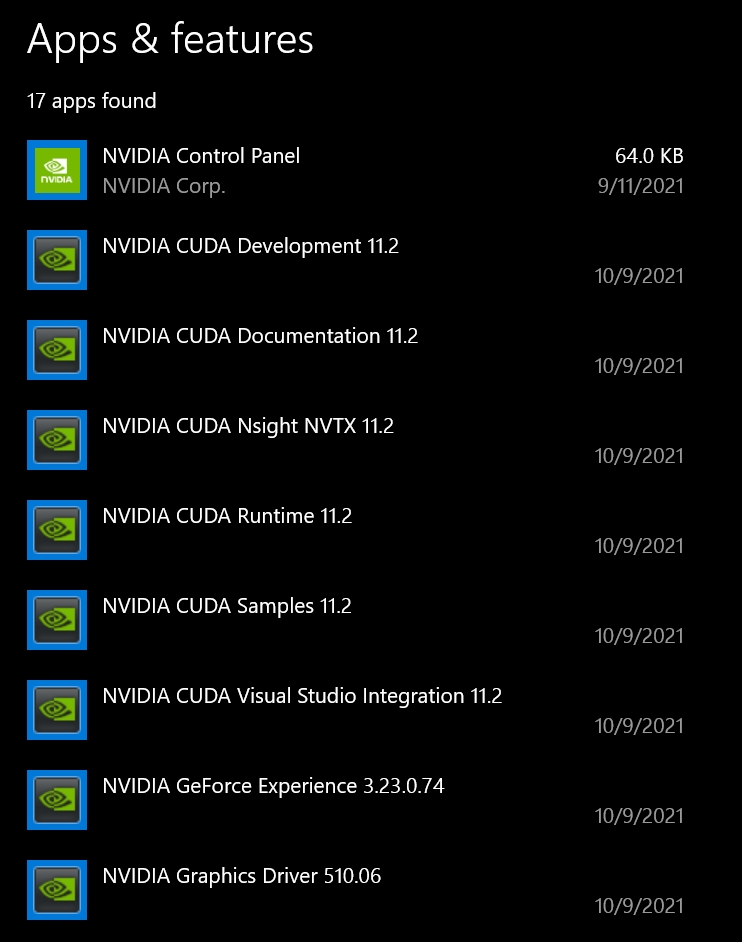
Go to your Settings on Windows and choose “Apps & Features”. Then, search for NVIDIA:
We want to install TF 2.6.0 which requires NVIDIA CUDA Toolkit version 11.2 (see the first link to double-check). If your drivers are any other version, delete all the ones that have “NVIDIA CUDA” in their title (leave the others). Then, go to Local Disk (C:) > Program Files > NVIDIA GPU Computing Toolkit > CUDA. There, you will see a folder with the CUDA version as a name. Delete that folder.
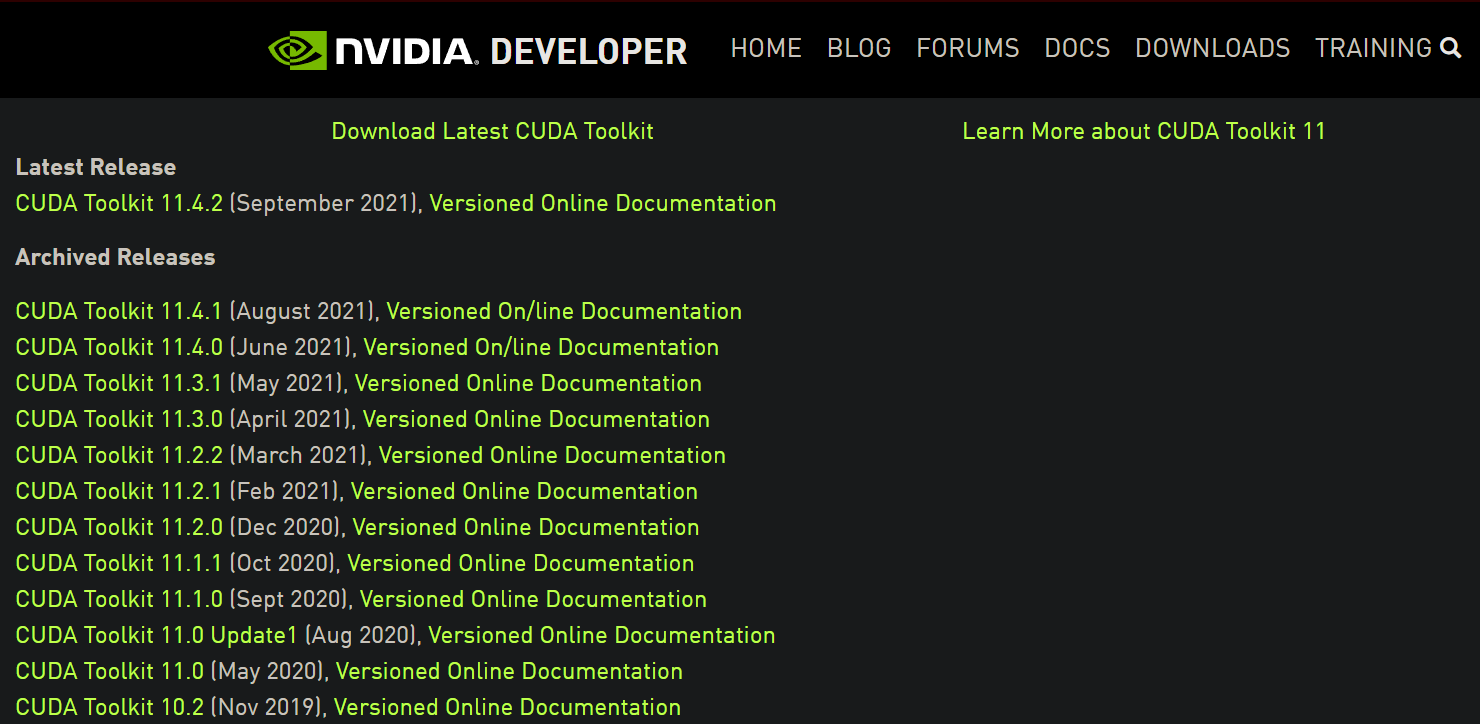
If you search for NVIDIA and no CUDA toolkit is found, go to this page. Here is what it looks like:
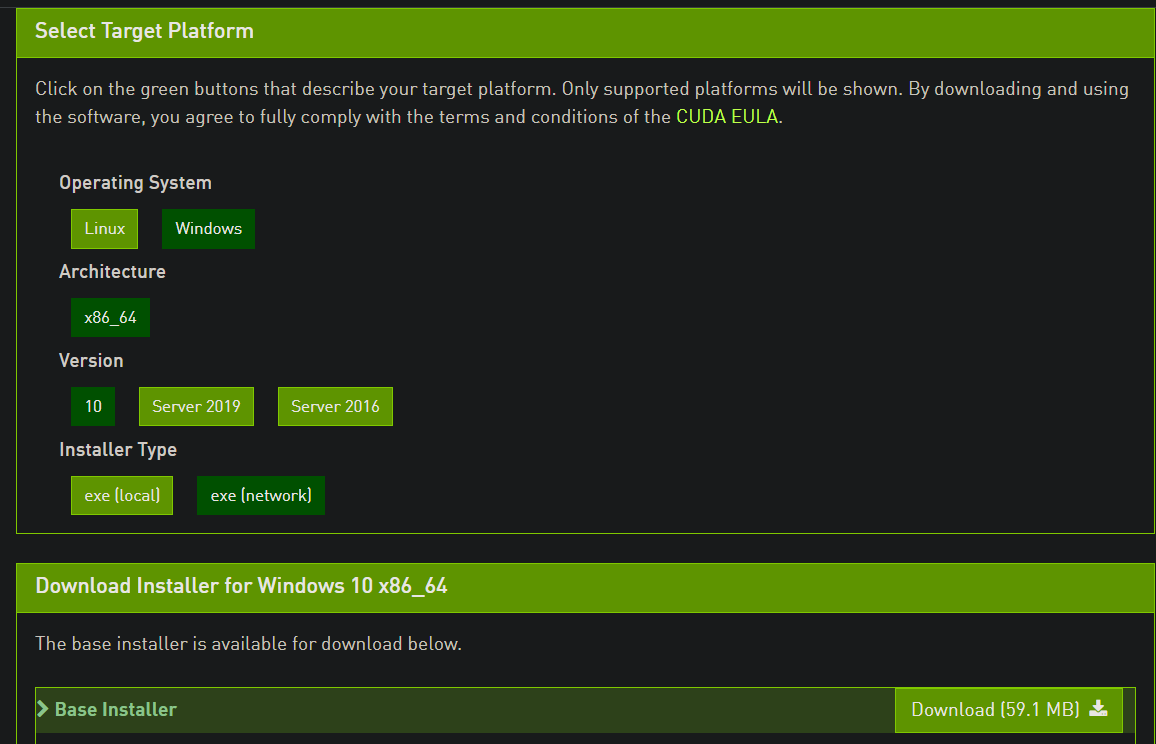
Here, we see three 11.2 versions, which are what we need (we got the version from the first TF version link I provided). Click on any of them and choose Windows 10, and download the network installer:
Follow the on-screen prompts and install the drivers with default parameters. Then, restart your computer and come back.
Step 4: Install cuDNN
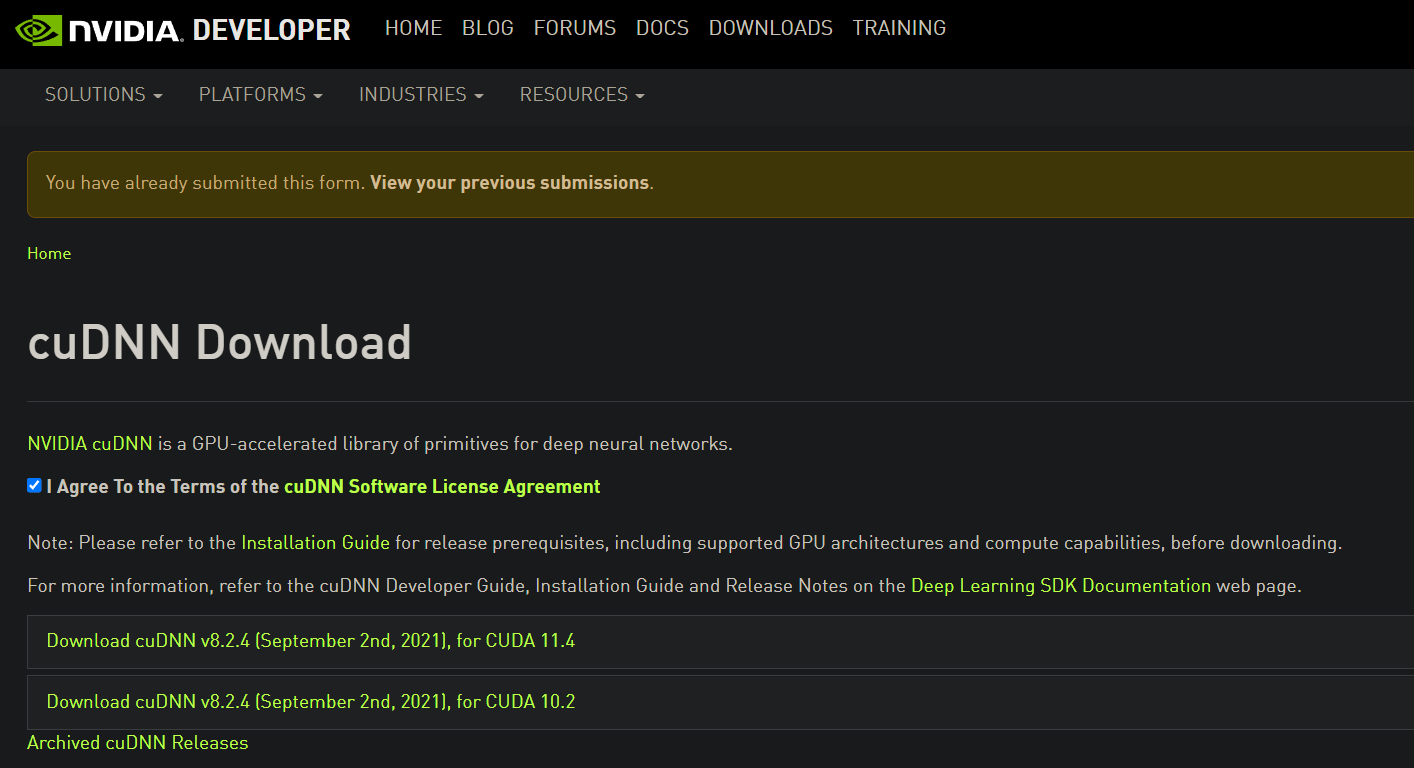
For TensorFlow 2.6.0, cuDNN 8.1 is required. Go to this page and press download:
It will ask you for an NVIDIA Developer account:
If you don’t have an account already, click “Join now” and enter your email. Fill up the form — the standard stuff. Then, go back to the cuDNN download page:
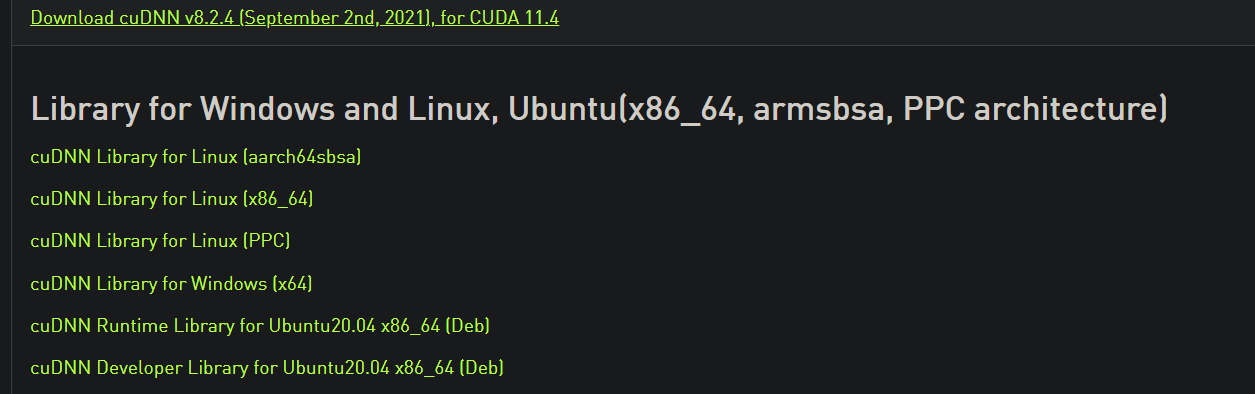
At the top, it will ask you to fill out a survey. Fill it out and you will be presented with the above page. Click on the first one since it is the one compatible with CUDA Toolkit v. 11.*. There, you will see a Windows version, which you should download.
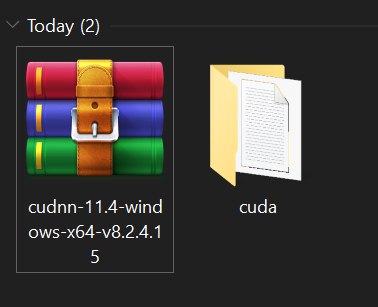
Step 5: Extract the ZIP folder and copy core directories
Extract the downloaded ZIP folder:
Open the cuda folder and copy the three folders at the top (bin, include, lib). Then, go to C:\Program Files\NVIDIA GPU Computing Toolkit\CUDA\v11.2 and paste them there.
Explorer tells you that these folders already exist, which you should press Replace the files in the destination. That’s it, we are done with the software requirements! Restart your computer once again.
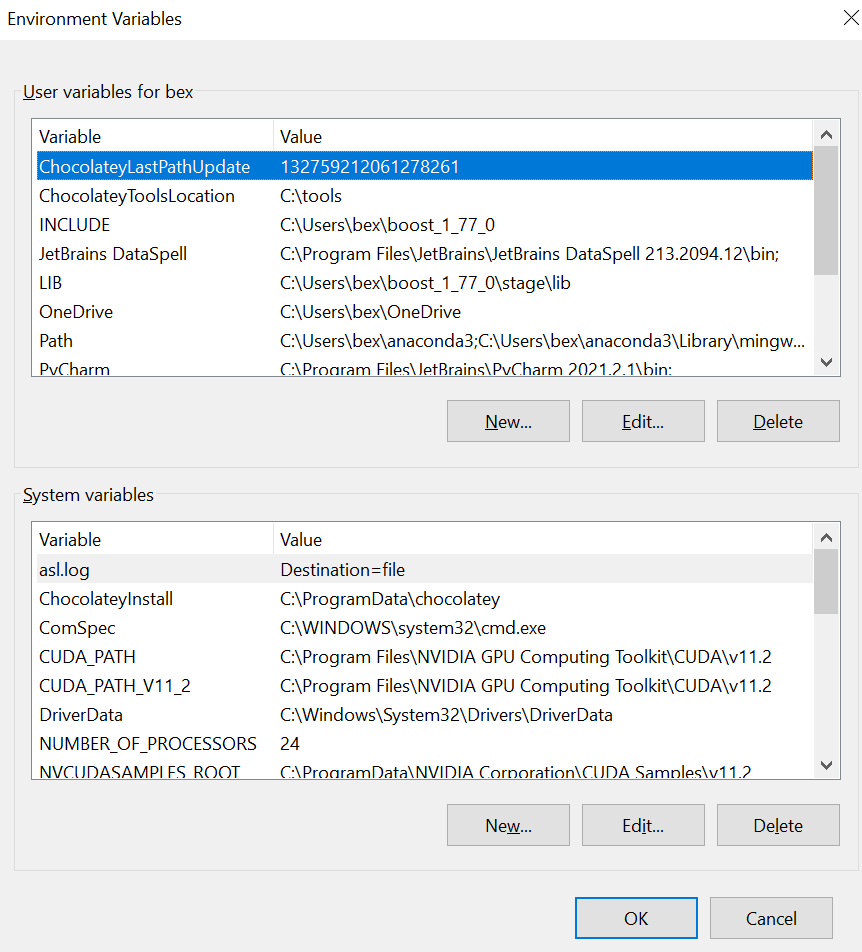
Step 6: Add CUDA toolkit to PATH
Now, it is time to add a few folders to the environment variables. In the last destination, C:\Program Files\NVIDIA GPU Computing Toolkit\CUDA\v11.2, there is a bin and folder:
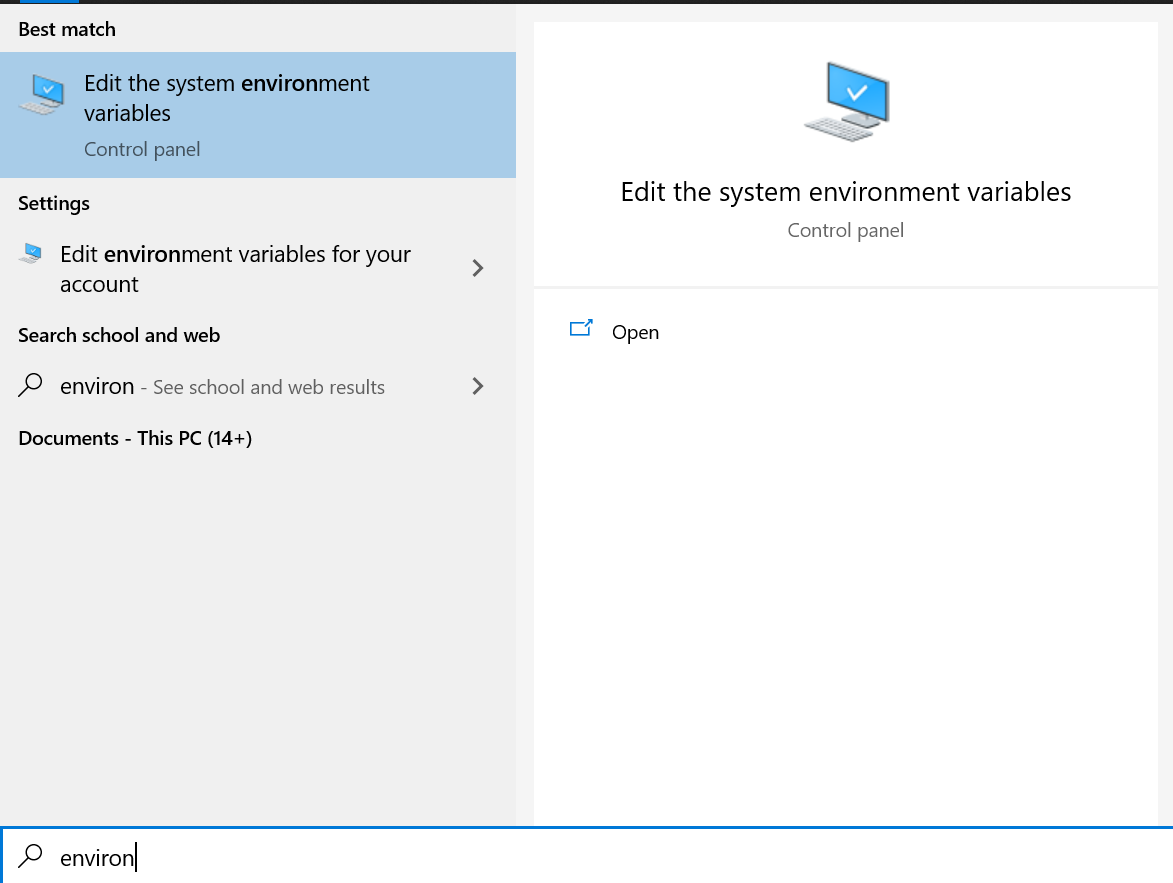
Open it and copy the file path. Then, press the “Start” (Windows) button and type “Environment variables”:
Open it and go to “Environment variables”. This will open this pop-up window:
Choose the “Path” from the top and press edit. Press “New” and paste the copied link there.
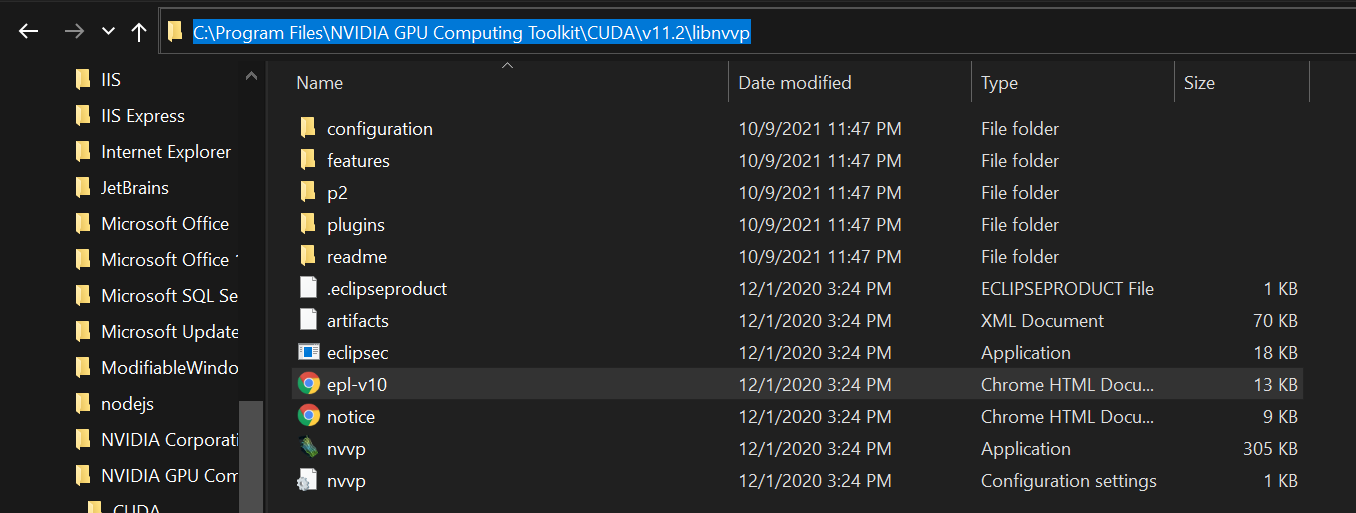
Then, go back to the GPU toolkit folder and open the libnvvp folder:
Copy its path and paste it to Environment variables just like you did with the bin folder. Then, close all pop-ups, saving the changes.
Step 7: Install TensorFlow inside a virtual environment with Jupyter Lab
Finally, we are ready to install TensorFlow. Create a virtual environment with your preferred package manager. I use conda, so I create a conda environment named tf with Python version 3.8.
It is important that both TensorFlow and JupyterLab are installed with either pip or conda. You will get a ModelNotFoundError in JupyterLab if they are installed from different channels.
Next, we should add the conda environment to Jupyterlab so that it is listed as a valid kernel when we launch a session:
ipython kernel install --user --name=<name of the kernel, `tf` for our case>
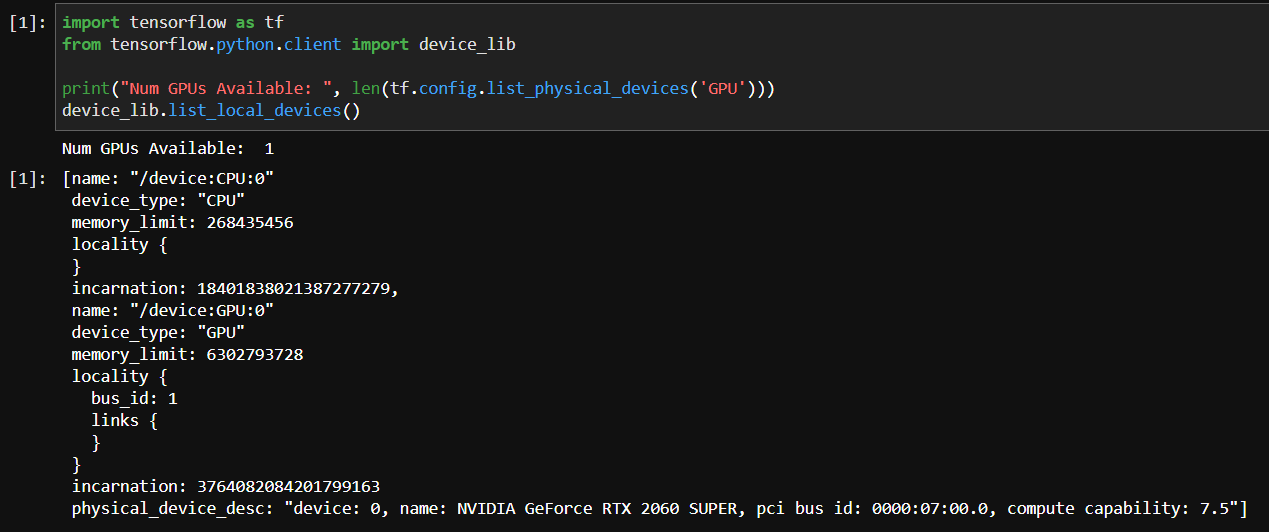
If you launch JupyterLab, you should be able to see the environment as a kernel. Create a new notebook and run this snippet to check if TF can detect your GPU:
import tensorflow as tf from tensorflow.python.client import device_lib
Some features of the CST Studio Suite tools can be controlled via CST Python Libraries.
Overiew
The cst package provides a Python interface to the CST Studio Suite.
cst.interface – Allows controlling a running CST Studio Suite.
cst.results – Provides access to 0D/1D Results of a cst file.
cst.eda – Provides an interface to a Printed Circuit Board (PCB).
General Notes
Supported is Python version 3.6.
Setup
The CST Studio Suite installation comes with Python 3.6, which requires no further setup to start using it with the CST Python Libraries. However, this is just a plain Python interpreter with only the standard libraries available. You may want to use a more feature rich Python 3.6 distribution like Anaconda with the provided CST Python Libraries. To start working with the CST Python Libraries from an external Python distribution, you will have to include the directory in Python’s system path.The easiest solution is to add or modify the PYTHONPATH system environment variable to include:
Windows: <CST_INSTALLATION_FOLDER>\CST STUDIO SUITE 2020\AMD64\python_cst_libraries
If you have installed the CST Studio Suite in a different location, please adjust the paths above. Consult your operating system user manual on how to set environment variables.
Alternatively you may modify sys.path in a running Python environment by calling:
Please replace <PATH_TO_CST_AMD64> above with the system dependent paths indicated above (i.e. under Windows use: <CST_INSTALLATION_FOLDER>\CST STUDIO SUITE 2020\AMD64).
You have succesfully set up your Python environment when you are able to execute the following code without error:
>>> importcst>>> print(cst.__file__) # should print '<PATH_TO_CST_AMD64>\python_cst_libraries\cst\__init__.py'
Problem: Submitting class assignments requires navigating a maze of web pages so complex that several times I’ve turned an assignment in to the wrong place. Also, while this process only takes 1–2 minutes, it sometimes seems like an insurmountable barrier (like when I’ve finished an assignment way too late at night and I can barely remember my password).
Solution: Use Python to automatically submit completed assignments! Ideally, I would be able to save an assignment, type a few keys, and have my work uploaded in a matter of seconds. At first this sounded too good to be true, but then I discovered selenium, a tool which can be used with Python to navigate the web for you.
Anytime we find ourselves repeating tedious actions on the web with the same sequence of steps, this is a great chance to write a program to automate the process for us. With selenium and Python, we just need to write a script once, and which then we can run it as many times and save ourselves from repeating monotonous tasks (and in my case, eliminate the chance of submitting an assignment in the wrong place)!
Here, I’ll walk through the solution I developed to automatically (and correctly) submit my assignments. Along the way, we’ll cover the basics of using Python and selenium to programmatically control the web. While this program does work (I’m using it every day!) it’s pretty custom so you won’t be able to copy and paste the code for your application. Nonetheless, the general techniques here can be applied to a limitless number of situations. (If you want to see the complete code, it’s available on GitHub).
Approach
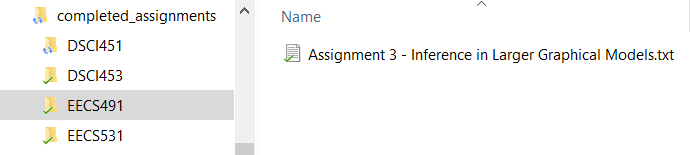
Before we can get to the fun part of automating the web, we need to figure out the general structure of our solution. Jumping right into programming without a plan is a great way to waste many hours in frustration. I want to write a program to submit completed course assignments to the correct location on Canvas (my university’s “learning management system”). Starting with the basics, I need a way to tell the program the name of the assignment to submit and the class. I went with a simple approach and created a folder to hold completed assignments with child folders for each class. In the child folders, I place the completed document named for the particular assignment. The program can figure out the name of the class from the folder, and the name of the assignment by the document title.
Here’s an example where the name of the class is EECS491 and the assignment is “Assignment 3 — Inference in Larger Graphical Models”.
File structure (left) and Complete Assignment (right)
The first part of the program is a loop to go through the folders to find the assignment and class, which we store in a Python tuple:
# os for file management
import os# Build tuple of (class, file) to turn in
submission_dir = 'completed_assignments'dir_list = list(os.listdir(submission_dir))for directory in dir_list:
    file_list = list(os.listdir(os.path.join(submission_dir,
directory)))
    if len(file_list) != 0:
        file_tup = (directory, file_list[0])

print(file_tup)('EECS491', 'Assignment 3 - Inference in Larger Graphical Models.txt')
This takes care of file management and the program now knows the program and the assignment to turn in. The next step is to use selenium to navigate to the correct webpage and upload the assignment.
Web Control with Selenium
To get started with selenium, we import the library and create a web driver, which is a browser that is controlled by our program. In this case, I’ll use Chrome as my browser and send the driver to the Canvas website where I submit assignments.
import selenium# Using Chrome to access web
driver = webdriver.Chrome()# Open the website
driver.get('https://canvas.case.edu')
When we open the Canvas webpage, we are greeted with our first obstacle, a login box! To get past this, we will need to fill in an id and a password and click the login button.
Imagine the web driver as a person who has never seen a web page before: we need to tell it exactly where to click, what to type, and which buttons to press. There are a number of ways to tell our web driver what elements to find, all of which use selectors. A selector is a unique identifier for an element on a webpage. To find the selector for a specific element, say the CWRU ID box above, we need to inspect the webpage. In Chrome, this is done by pressing “ctrl + shift + i” or right clicking on any element and selecting “Inspect”. This brings up the Chrome developer tools, an extremely useful application which shows the HTML underlying any webpage.
To find a selector for the “CWRU ID” box, I right clicked in the box, hit “Inspect” and saw the following in developer tools. The highlighted line corresponds to the id box element (this line is called an HTML tag).
HTML in Chrome developer tools for the webpage
This HTML might look overwhelming, but we can ignore the majority of the information and focus on the id = "username" and name="username" parts. (these are known as attributes of the HTML tag).
To select the id box with our web driver, we can use either the id or name attribute we found in the developer tools. Web drivers in selenium have many different methods for selecting elements on a webpage and there are often multiple ways to select the exact same item:
# Select the id box
id_box = driver.find_element_by_name('username')# Equivalent Outcome!
id_box = driver.find_element_by_id('username')
Our program now has access to the id_box and we can interact with it in various ways, such as typing in keys, or clicking (if we have selected a button).
# Send id information
id_box.send_keys('my_username')
We carry out the same process for the password box and login button, selecting each based on what we see in the Chrome developer tools. Then, we send information to the elements or click on them as needed.
Once we are logged in, we are greeted by this slightly intimidating dashboard:
We again need to guide the program through the webpage by specifying exactly the elements to click on and the information to enter. In this case, I tell the program to select courses from the menu on the left, and then the class corresponding to the assignment I need to turn in:
# Find and click on list of courses
courses_button = driver.find_element_by_id('global_nav_courses_link')courses_button.click()# Get the name of the folder
folder = file_tup[0]

# Class to select depends on folder
if folder == 'EECS491':
    class_select = driver.find_element_by_link_text('Artificial Intelligence: Probabilistic Graphical Models (100/10039)')elif folder == 'EECS531':
    class_select = driver.find_element_by_link_text('Computer Vision (100/10040)')# Click on the specific class
class_select.click()
The program finds the correct class using the name of the folder we stored in the first step. In this case, I use the selection method find_element_by_link_text to find the specific class. The “link text” for an element is just another selector we can find by inspecting the page. :
Inspecting the page to find the selector for a specific class
This workflow may seem a little tedious, but remember, we only have to do it once when we write our program! After that, we can hit run as many times as we want and the program will navigate through all these pages for us.
We use the same ‘inspect page — select element — interact with element’ process to get through a couple more screens. Finally, we reach the assignment submission page:
At this point, I could see the finish line, but initially this screen perplexed me. I could click on the “Choose File” box pretty easily, but how was I supposed to select the actual file I need to upload? The answer turns out to be incredibly simple! We locate the Choose File box using a selector, and use the send_keys method to pass the exact path of the file (called file_location in the code below) to the box:
# Choose File button
choose_file = driver.find_element_by_name('attachments[0][uploaded_data]')# Complete path of the file
file_location = os.path.join(submission_dir, folder, file_name)# Send the file location to the button
choose_file.send_keys(file_location)
That’s it! By sending the exact path of the file to the button, we can skip the whole process of navigating through folders to find the right file. After sending the location, we are rewarded with the following screen showing that our file is uploaded and ready for submission.
Now, we select the “Submit Assignment” button, click, and our assignment is turned in!
# Locate submit button and click
submit_assignment = driver.find_element_by_id('submit_file_button')
submit_assignent.click()
Cleaning Up
File management is always a critical step and I want to make sure I don’t re-submit or lose old assignments. I decided the best solution was to store a single file to be submitted in the completed_assignments folder at any one time and move files to asubmitted_assignments folder once they had been turned in. The final bit of code uses the os module to move the completed assignment by renaming it with the desired location:
# Location of files after submission
submitted_file_location = os.path.join(submitted_dir, submitted_file_name)# Rename essentially copies and pastes files
os.rename(file_location, submitted_file_location)
All of the proceeding code gets wrapped up in a single script, which I can run from the command line. To limit opportunities for mistakes, I only submit one assignment at a time, which isn’t a big deal given that it only takes about 5 seconds to run the program!
Here’s what it looks like when I start the program:
The program provides me with a chance to make sure this is the correct assignment before uploading. After the program has completed, I get the following output:
While the program is running, I can watch Python go to work for me:
Conclusions
The technique of automating the web with Python works great for many tasks, both general and in my field of data science. For example, we could use selenium to automatically download new data files every day (assuming the website doesn’t have an API). While it might seem like a lot of work to write the script initially, the benefit comes from the fact that we can have the computer repeat this sequence as many times as want in exactly the same manner. The program will never lose focus and wander off to Twitter. It will faithfully carry out the same exact series of steps with perfect consistency (which works great until the website changes).
I should mention you do want to be careful before you automate critical tasks. This example is relatively low-risk as I can always go back and re-submit assignments and I usually double-check the program’s handiwork. Websites change, and if you don’t change the program in response you might end up with a script that does something completely different than what you originally intended!
In terms of paying off, this program saves me about 30 seconds for every assignment and took 2 hours to write. So, if I use it to turn in 240 assignments, then I come out ahead on time! However, the payoff of this program is in designing a cool solution to a problem and learning a lot in the process. While my time might have been more effectively spent working on assignments rather than figuring out how to automatically turn them in, I thoroughly enjoyed this challenge. There are few things as satisfying as solving problems, and Python turns out to be a pretty good tool for doing exactly that.
As always, I welcome feedback and constructive criticism. I can be reached on Twitter @koehrsen_will.
% Extract data from image along two point defined 1D line in MATLAB
I=imread(‘P1.jpg’); J=rgb2gray(I); imshow(J); [x,y]=ginput(2); %force matlab show a vertial and horizental line for reading in coordinates hold on % shown line on figure plot(x,y); figure improfile(J,x,y)